Nuevas entradas en: mymacrotips
Quiero compartir con vosotros los trucos para hacer fotos macro con el móvil que he descubierto a base de prueba y error. Muchas pruebas, muchos errores y sobre todo, muchísima paciencia.
Aquí podéis acceder a una primera guía, que también está disponible en Instagram.
Si, hay móviles con modo macro.
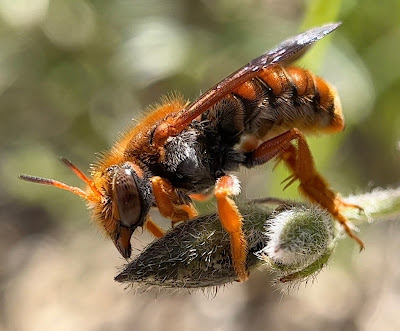
Entre los diferentes modelos de marcas como Samsung, Oppo, Xiaomi, Motorola, Nokia y ahora iPhone, hay modelos que tienen un “modo macro” e incluso tienen cámaras específicas. Con ellos se pueden obtener resultados espectaculares, aunque tienen sus limitaciones, sobre todo en cuanto a distancia de enfoque. Para mi fue una sorpresa que mi viejo Lumia 640 (Nokia con Windows Phone) que sólo tenía una única cámara de fotos principal permitiera hacer unas macro estupendas, como la de la mariposa de abajo.
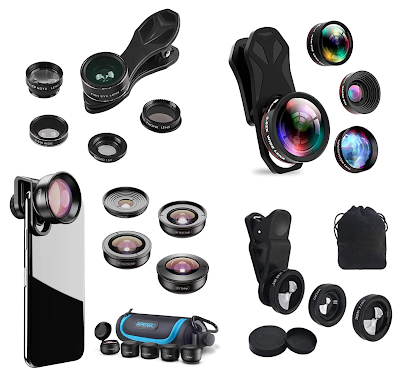
Si compras un kit, guarda la macro y tira las otras.
Bueno, no las tires, guárdalas por si acaso en un cajón. En las fotos de venta queda muy llamativo un kit compuesto por varias lentes, y más a un precio atractivo. Pero es rarísimo que llegues a utilizar alguna que no sea una macro. Yo no uso jamás las “ojo de pez”, ni las “gran angular”, ni las “telefoto”, porque son juguete de un día. De hecho, si compro un kit compuesto por macro y gran angular lo hago a sabiendas de que el angular va a acabar en un cajón. El precio suele justificarse por la calidad de los materiales, como lentes de cristal de calidad montadas en aluminio en vez de compuestos resinosos y plástico. Un fotógrafo “de verdad” se reiría al ver los precios que a mi me parecen caros, o sea, más de 40-50€.
Prueba con diferentes tipos lentes.
No dudes en probar lentes que estén a tu alcance: de unos binoculares viejos, de un cuentahilos, de una lupa de bolsillo… Yo llevo siempre encima -porque me cabe en el bolsillo pequeño del pantalón- una lente que desmonté de unos prismáticos de mercadillo de segunda mano y que sujeto con una simple goma. Y he conseguido con ella mejores resultados que con la mayoría de lentes específicas para smartphone. Por supuesto, no todas sirven, y hay que comprobar qué distancia de enfoque requieren -para la cámara de tu smartphone- antes de romperte la cabeza buscando la forma de hacerles un acople casero para sujetarlas al móvil.
Más aumento no es siempre mejor.
Las lentes baratas de pinza (5-15€) pueden aumentar muchísimo aunque generen distorsiones y aberraciones en la imagen. Las hay de mejor calidad, también con mucho aumento y con mejores resultados, pero tanto éstas como las anteriores tienen un problema: una distancia de enfoque muy corta, con la que sólo consigues una imagen nítida si te acercas muchísimo a lo que quieres fotografiar. A ningún insecto les gusta que les acerques el móvil a uno o dos centímetros.
El enfoque correcto es fundamental.
Que los pequeños detalles se vean nítidos es importante, pero cuanto más cerca haya que situarse del motivo que se desea fotografiar, menor será la profundidad de campo. Así por ejemplo, para un insecto visto de frente, podrías ver desenfocada la cabeza, nítido el torso, y el abdomen podría ser una mancha borrosa. Con menos aumento y menor acercamiento la profundidad de campo será mayor y quedaran enfocadas más zonas de la imagen. Por esto, hay fabricantes como Apexel, que ofrece el “2 en 1 Clip-On Kit de Lentes”, con una Macro 12X y otra 24X, para usar una u otra según el caso.
Pero el desenfoque también lo es…
Como hemos visto, en las fotos macro hay un efecto casi inevitable: el motivo principal aparece enfocado, pero todo lo que esté un poco más lejos -o demasiado cerca- aparece desenfocado. Y esto, lejos de ser un defecto es lo que da ese encanto especial a estas fotos. Algunos fondos desenfocados pueden ser muy bonitos incluso cuando no se llega a apreciar qué es lo que lo conforma. La luz reflejada en flores, hojas o gotas puede crear un efecto bokeh precioso.
El movimiento es un problema.
Fotografiar escarabajos suele ser sencillo, pero otros insectos no paran de moverse. Se puede seguir el movimiento casi lineal de una hormiga, pero el vuelo oscilante de una abeja es muy difícil de seguir y mantener enfocado, y más cuando el aumento es grande y se sale constantemente del campo de visión.
Por esto, a veces son más prácticas las lentes que aunque aumenten menos, su distancia de enfoque más larga no requiere que te acerques tanto y ofrecen mayor campo de visión. existen lentes (Apexel Macro 100mm o la Mugast Macro 100mm…) más caras que la media, pero tienen una distancia de enfoque mayor de la habitual, y permiten disparar una foto macro desde una distancia entre 4 - 7 cm.
Trípode: si pero no.
Si haces fotos de texturas, gotas, vegetales u objetos inanimados, y más si las haces en la cocina de tu casa, utiliza un pequeño trípode o apoya el móvil sobre algún objeto. Sin embargo, salir a un parque o al campo y pretender usar el trípode para fotografiar insectos es muy optimista, a menos que encuentres una hermosa telaraña con su dueña posando estática sobre ella. Yo siempre meto el trípode en la mochila por si acaso, pero es muy raro que se de la ocasión de usarlo para hacer una macro.
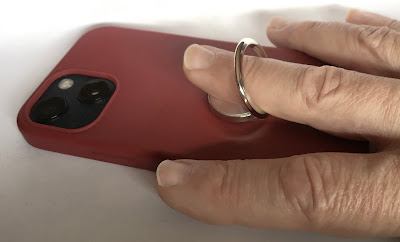
Utiliza un agarre o anillo de sujeción.
En muchas ocasiones, para acercarte lo suficiente al objeto o insecto a fotografiar es necesario adoptar posturas complicadas, en las que es necesario apoyarse o agarrarse con una mano, mientras que con la otra tienes que sujetar el móvil y disparar. Esto supone que la foto salga movida y el peligro de que se te caiga. Para evitar esto puede ser útil uno de esos anillos o agarres plegables de sujeción que se adhieren o sujetan a la carcasa del smartphone. Yo he preferido coser a la funda del smartphone una cinta elástica, porque no me molesta en absoluto en el bolsillo y no acabo de confiar en algo que pueda despegarse en el momento menos oportuno.
Disparador remoto bluetooth.
Incluso utilizando un agarre, el anillo de sujeción o el invento de la cinta, puedes mover demasiado el móvil al hacer el gesto de pulsar el botón de la cámara en la pantalla o uno de los botones físicos de volumen. Esto hará que la foto salga movida, y para evitarlo puedes utilizar un disparador remoto o botón bluetooth de disparo con la otra mano.
Haz muchas, muchísimas fotos.
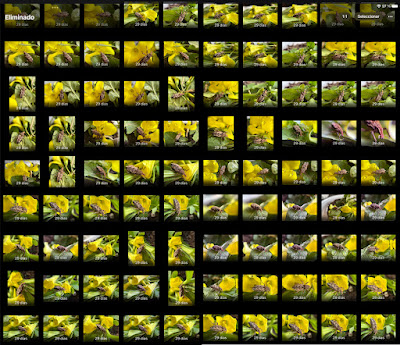
Con suerte, puede que salga bien alguna. No borres nada hasta que las puedas verlas en casa con tranquilidad. Eso si, a continuación hay que ser implacable y borrar sin miedo. Deja pasar unos días, y como ocurre en las fotos de viajes, descubrirás que la mayoría no valen la pena. Y si las revisas tras un par de semanas acabarás conservando muy pocas.
Ten mucha paciencia.
Con los animales en general, pero también con las macros de insectos, arañas, etc… hay que tener mucha paciencia. Yo he perseguido mariposas durante horas para conseguir hacer alguna foto… que ha resultado inservible. Si un día no consigues nada que valga la pena no te frustres, es lo normal. Otro día será. Y si consigues hacer algo interesante con una libélula y un móvil, me avisas.
Dispara ráfagas.
Si tu smartphone lo permite, dispara ráfagas, para seleccionar luego la mejor o mejores. Esto es casi imprescindible si el sujeto es un animal que está volando o se mueve mucho. Los iPhone, además de ráfagas también hacen Live Photos, o cortas secuencias animadas realizadas tomando varias imágenes, y que también permiten seleccionar la mejor.
Antes, mide, enfoca y bloquea.
ANTES de hacer fotos de insectos o pequeños reptiles, enfoca y bloquea a una distancia concreta, usando una flor como referencia, por ejemplo) y LUEGO acerca y aleja la lente del animal buscando el enfoque óptimo. Utilizar el enfoque manual funciona con flores, plantas y texturas inanimadas, pero no tendrás tiempo con animales en movimiento o que pueden huir al ver acercarse tu móvil.
Dispara desde diferentes ángulos.
Haz las fotos desde diferente ángulos, buscando diferentes composiciones. Una flor fotografiada desde arriba puede crear un efecto geométrico interesante, pero en un insecto la imagen queda demasiado plana. Yo suelo buscar cierto escorzo, para dar más profundidad a la imagen. Y como ya hemos dicho antes, el fondo y sus colores y formas es muy importante aunque quede completamente desenfocado.
Es necesaria bastante luz.
Fíjate en los diferentes ángulos en que incide la luz. A veces la posición respecto al sol hace inevitable que tapes la luz con tu propio smartphone. Yo uso un pequeño truco: suelo llevar en la cartera una tarjeta forrada de papel de aluminio, para -a modo de espejo- reflejar la luz del sol hacia la flor, insecto u objeto desde un ángulo diferente. Una pequeña linterna LED también podría ser útil. Si vas acompañado, puedes ayudarte de la linterna de otro móvil. Si lo ves necesario, uso el control de exposición que ofrecen la mayoría de smartphones para evitar zonas sobrexpuestas o “quemadas” por exceso de luz.
No te dejes las gafas en casa.
No es una tontería: si necesitas “gafas de cerca”, llévalas contigo cuando vayas a hacer fotos. Debes asegurarte de ver las imágenes mostradas por el smartphone perfectamente nítidas y no presuponer que las está enfocando bien automáticamente.
Haz trampa, los profesionales también las hacen.
Como puedes suponer, algunas de las imágenes sorprendentes que ves en los documentales se han conseguido en entornos controlados. Se fuerza que el animal pase por determinados puntos, a las serpientes se les ponen ratones a su alcance, la madriguera por la que se mete la cámara está recreada en un estudio… y se utilizan terrarios.
Si fotografiar o filmar un escarabajo o caracol resulta incómodo en el jardín o hace mal tiempo, llévatelo a casa. Y no hace falta que al pobre bicho le ates una patita para que no corra por todo el salón; puedes hacer un recinto con dos platos y un poco de agua que sirva de set de rodaje.
Pásatelo bien pero disfruta el momento.
En la película “La Vida Secreta de Walter Mitty”(2013), el protagonista Walter Mitty (Ben Stiller), tras una larga búsqueda localiza en una remota e inaccesible zona del Himalaya al famoso fotógrafo Sean O'Connell (Sean Penn). A lo lejos, juegan unos leopardos de las nieves, algo hermoso y dificilísimo de ver. Sin embargo, a pesar de tener el equipo fotográfico preparado, el fotógrafo no toca la cámara. ¿No vas a disparar?, le pregunta extrañado Mitty. A veces, le contesta Sean, no quiero que la foto me estropee el momento.
Pues eso, disfruta del paseo, de la naturaleza, del sol o de la lluvia, pero que la foto no te estropee el momento.


